domingo, 30 de septiembre de 2012

DIY: Calendario

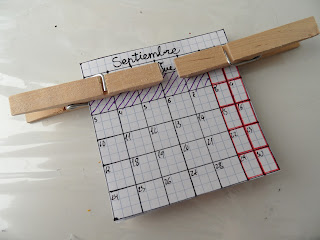
¡Buenas! para este curso no tenía pensado comprar una agenda porque al final acababa olvidada en el fondo de la mochila y no la usaba nada, pero de alguna forma tenía que organizarme, así que decidí hacer este calendario para ponerlo en mi archivador y poder apuntar exámenes y demás.
Si os gusta, os enseño como hacerlo ^.^

Hi! this year I'm not going to buy a diary for school because I always forget it at the bottom of my bag and I never use it, but I have to organise myself in some way so I decided to make this calendar so I can put it in a note book and write the exams and so.
If you like it, I show you how to do it ^.^


Comenzamos haciendo las hojas. Lo podéis hacer por ordenador, o como yo a mano, aquí cada uno a su gusto.

We start by making the sheets. You can make them with the computer or, like me, by hand.


Una vez tengas todas las hojas listas, ponlas en orden y a la misma altura en la parte superior y sujétalas bien con pinzas.

When you have all the sheets ready, put them in order and hold them with clothespins.


Echa un poco de cola blanca en un papel y moja el borde superior de las hojas en el.

Put some glue in a paper and dip the upper side of the sheets in it.


Espera a que se seque muy bien y ¡Listo! ya puedes pegarlo en cualquier sitio.

Wait until it's completely dry and that's all!


Para qué engañarnos, lo que más mola de estos calendarios es poder arrancar las hojas, una pena que para este haya que esperar un mes... quizás se puede hacer una versión por semanas, que por días ya va a ser muy latoso de hacer...

The coolest thing of this calendars is when you tear out one sheet. With this calendar you just can do it once a month, but maybe a weekly version can be made. Not daily, it would be too much work


domingo, 23 de septiembre de 2012

DIY. hama beads: pokeball


¡Hola! Hoy os traigo una entrada bastante breve, ya he pillado el primer catarro del otoño y no estoy de humor para escribir mucho rollo...

Hi! well, today's entry is goingo to be a bit short because I'm ill and I'm not in the mood to write a lot...


¡Vamos con otra frikada! un colgante de hama beads de una poke ball.
Normalmente todas las figuras que se hacen con las hama beads del ikea son demasiado grandes como para poder llevarlas de colgante, pero esta tiene el tamaño justo.

Here's a pokeball necklace made with hama beads. These ikea beads are usually too big to make a necklace with them, but in this case it has the prefect size.


No he podido sacaros el patrón porque esta se hace con tablilla de pinchos redonda, y no encontraba programa que la tuviera, pero de todas formas creo que es sencilla de sacar por la foto.
Planché la figura por ambos lados y después le pegué con silicona la piecilla para poder colgarla.

I wasn't able to do the pattern because I couldn't find a program which made circle patterns, but I think it isn't difficult to do by looking to the photo. I ironed both sides and then glued a piece so I could hang it.


¡Y no hay más! rápido, fácil y resultón XD

¡And that's all!


domingo, 16 de septiembre de 2012

Back to school nail art

Último día de vacaciones...
Hoy os vengo a enseñar un nail art inspirado en el comienzo del curso, que básicamente fusiona dos técnicas ya bastantes conocidas: las uñas con papel de periódico y las de lápiz.

Last day of holidays...
Today I'm showing you this nail art for back to school. They're basically two really known tecniques, the newspaper nails and the pencil nails.


Comenzamos pintando todas las uñas de blanco menos el anular que lo pintaremos de un color amarillo anaranjado.

Start by painting all your nails white except the ring finger, paint it in a yellow-orange colour.


Vamos a hacer primero el lápiz. Para la goma pintaremos algo menos de la mitad de la uña de color rosa.

To make the pencil paint half of your nail pink. It will be the rubber.


Y para hacer la parte metálica que sujeta la coma al lápiz pintaremos una raya más en un color grisáceo (si lo tenéis metalizado mejor que mejor)

Now make a grey stripe between the pink and the yellow. (Better if it's a metallic grey)


Para terminar hacemos dos líneas finas en negro.

Finish the desing by making two small black stripes in the yellow part.


Ahora vamos con las uñas de papel de periódico. Corta unas cuantas tiras de periódico, deja que se mojen el alcohol unos 5 segundos. A continuación coloca la tira en la uña y presiona sobre ella durante unos 15 segundos.

Now let's do the newspaper nails. Cut some newspaper striper and soak them in alcohor for about 5 seconds. Then place them in the nail and press for about 15 seconds.


Ahora retira la tira de periódico, la tinta debería haber pasado a la uña.

Remove the stripe. The ink sholud have passed to the nail.


En este tipo de uñas es muy importante dar una pasada de esmalte transparente, ya que la tinta se va muy fácilmente. Por probar yo use uno de acabado mate.

In this type of nails if important to finish with a top coat, because the ink disappears easiliy. I tried witha a matt top coat.

¡Y listo! Espero que os guste y lo probéis (si no lo habéis hecho antes). Las de papel de periódico son muy fáciles y rápidas de hacer,
quedan muy bonitas y no se necesita tener un gran pulso ;)

And you are ready! I hope you like it and try it (if you haven't yet). The newspaper ones are really quick and easy to do, even if your hand tends to shake!


miércoles, 12 de septiembre de 2012

DIY: Lápiz baquetas

¡Hola! Hoy por fin os voy a enseñar el proyecto con el que gané el concurso de cut out + keep y que además vienen muy bien ahora que va a empezar el curso ¡Los lápiz baquetas!

Hi! today I'm finally going to show you the project that I entered for the cut out + keep contest. It's also a good craft idea now that we are starting school, the pencil drumsticks!


Lo único que se necesita son dos lápices, lija y algo con lo que tallarlos: un cuchillo, un cutter...

The only things we need are two pencils, sandpaper and something to carve them.


Comenzamos limando los lápices para quitarles la pintura y que queden con una forma redondeada.

Start sanding the pencils until all the paint is removed and they have a round shape.


A continuación cogemos la herramienta con la que vayamos a tallar y seguimos la siguiente forma:

Now we take the carving tool and follow this pattern:


Para darle un buen acabado vuele a limar un poco la zona tallada.

Finish off by sanding a bit more the carved zone.


¡Y listo! 

And that's all!


Espero que con esta idea el comienzo de curso se os haga un poco menos amargo, al menos tendréis algo con lo que entreteneros ;)

Si os ha gustado la idea y vais a hacerla enseñadme el resultado en facebook, que seguro que me hace mucha ilu ^.^


miércoles, 5 de septiembre de 2012

DIY: pulsera trenzada con cuentas

¡Hola! Hoy os traigo una pulsera más ;)
Es muy fácil de hacer, básicamente es una trenza con las cuentas intercaladas, aquí os dejo el paso a paso:

Hi! I'm here today with another bracelet ;)
It's really easy to do, basically it's a braid with beads inserted, here's the how-to:


Empezamos con tres hilos, algo más largos que la muñeca, los anudamos y trenzamos una parte para después poder atarla. 

We start with three threads, a bit longer than your wrist. We tie them together and braid one part so then we can wear it.


Ahora coloca una cuenta en los dos hilos que están en los extremos y sigue trenzando.

Now put one bead in the two threads which are at the extreme and keep braiding.


Ahora simplemente continua así hasta alcanzar el largo deseado y trenza sin cuentas el final.

Now just keep doing the same until you reach the desired lenght and braid without beads the end of the thread.


¡Y listo!

And that's all!


 Como veis es muy fácil de hacer y muy resultona, no lleva nada de tiempo hacerla. Yo use perlas porque era lo que tenía a mano pero, cómo no, podéis experimentar con todo tipo de cuentas e hilos ;)

As you can see it's really easy and it looks really good. As always, you can experiemt with other kinds of threads or beads ;)


domingo, 2 de septiembre de 2012

Red Hot Chili Peppers converse

¡Hola! bueno, hoy solamente quería rendir tributo al proyecto que considero el inicio de mi afición crafter y que hoy se despide de nosotros...

Hi! well, today I just wanted to tribute the first poject which started my crafter hobby and today it says godbye to us.


Me refiero a mis convers de los Red Hot Chili Peppers. En aquellos días no tenia pinturas textiles asi que tuve que improvisar con lo que había a mano: pintauñas. Todos me decían que eso no duraría ni dos días, pero aún se mantienen intactas.

These are my Red Hot Chili Peppers convers. In those days I didn't have fabric paints, so I had to use nail polishes. People said that it wouldn't last but it still remains.


Aquí esta una foto de su estado actual (no tienen cordones porque a mi madre le dio por lavarlas) Como veis ya están un pelín hechas polvo sobre todo en la goma de delante, que tiene un agujero... Bueno, que (muy a mi pesar) ya les tocaba jubilarse, y estas vienen a ser sus sustitutas:

Here's a photo of their actual state (they don't have laces because my mother washed them) As you can see they're a bit worn-out specially the front gum which has a hole. It's time for them to retire and these are their substitutes:


¡Unas converse blancas! si he de ser franca las compré en honor a doctor who (puede que haya quien no le vea la relacion pero, creeme, la hay) y vaya, que estoy encantada de la vida ^^

White converse! ok, I bougth them in honor of doctor who (some of you might not see any relation but, tust me, there is)


¡Y por hoy no hay más! Ha sido una entrada con no mucho contenido pero creo que de aqui se puede sacar que a un solo producto se le puede dar mas de un uso ;)

Anything else by now! This entry doesn't have much content but with this you can discover that a product may have more than one use ;)


LinkWithin

Related Posts Plugin for WordPress, Blogger...